Pages

Thursday, December 26, 2013

Hot Chocolate Snowman jars

Hello,

I hope everyone had a great Christmas. I wanted to share some pictures of Christmas gifts I made for some family members. I have seen these Snowman jars on YouTube and Pinterest and knew I had to try them. I hand painted the faces and buttons. I used girls socks for the hat and scarf and typed up the "Snowman Soup" recipe tag. I used white puffy paint for the snowflakes.  You can fill the jars up with whatever you really want. I filled one snowman with taffy candy. They where a hit! 

Thanks for stopping by!


Tuesday, December 24, 2013

Have a very Merry Christmas

Hello,

As we all are rushing around to buy those last minute gifts, wrap all those gifts and spend time with our families, I hope we take the time to reflect on the true meaning of Christmas...the birth of our Savior Jesus Christ.  I hope you all have a wonderful Christmas with much love, family and great memories.  I will leave you tonight with two more Christmas projects I made this season. 

Candle making was new for me this year.  I did a lot of research this past summer and watched a lot of "How to" videos.  I can tell you that it was not as easy as some would lead you to believe at least not for me.  But I was determined to start and complete my projects. Although they were not great sellers for me personally I was pretty happy on how they came out. What do you think? :)


Thank you for stopping by!

Saturday, December 21, 2013

Cupcake Crazy

Hello everyone,

Hope all of you are doing well!  Christmas is just next week and of course I am not prepared! :(
I wanted to share more Christmas projects I made this Christmas and Christmas' past. All items shown are handmade. I went a little cupcake crazy this year but I can't seem to get tired of creating cupcake gifts. I hope you enjoy them and hopefully inspires you to go a lil nuts for cupcakes :)


Frosty the snowman cupcake was made from a pattern I purchased from Kimberley Crafts on Etsy. Love her patterns!


Hand painted leopard pattern cupcake. 
 
I made the mini gingerbread's from polymer clay. 
 
The cupcake candle smells just like a cupcake!


Hand painted wine glasses to look like cupcakes!

Saturday, December 7, 2013

Christmas handmade crafts

Hello,

I have been missing in action too long now, sorry for that.  It has been really busy at work and at home and I just haven't had the energy to blog or work on any Stampin Up projects.  Today however I would like to share some of the many Christmas craft projects I have made for the Christmas boutiques I participate in every year.  I hope you enjoy them!


Thanks for stopping by.

Thursday, October 31, 2013

Halloween Pumpkin Witch

Hello,

I know I haven't been active with posting Stampin Up projects but this is a very busy time of year for me.  I have been busy trying to prepare for up coming Christmas Boutiques.  I will share pictures in the near future. 

Today I want to share something different. I entered into a pumpkin contest that the Building I work in hosts each year. I was lucky enough to be chosen as one of the five winners! Not bad for my first try 😊. I painted the face of my Glamor Witch pumpkin and dressed her all up. I had to use what I could at work so I didn't have to transport tons of stuff from home.  My clever coworkers suggested to use clay plant pots for the body. So we "borrowed" two from our plants in the department and used my witch costume to dress her up. Another coworker brought some great bling jewelry to add that special touch. 

I am also including some other awesome pictures of pumpkins that were entered in the contest. People are sooo creative! 


Halloween Pumpkin contest 2013


Thanks for stopping by!

Wednesday, October 9, 2013

Stampin Up Halloween Witch

Hello,

I can't believe we are already in October! The Holidays are just around the corner, how scary is that?! LOL :)

I love Halloween and decorating my house for it. I prefer the cute Halloween decorations versus the "scary" kind.  I decorate my house with tons of decorations I have collected over the years. If you know me well enough than you know I have a slight obsession with pumpkins! But that's for another day :)

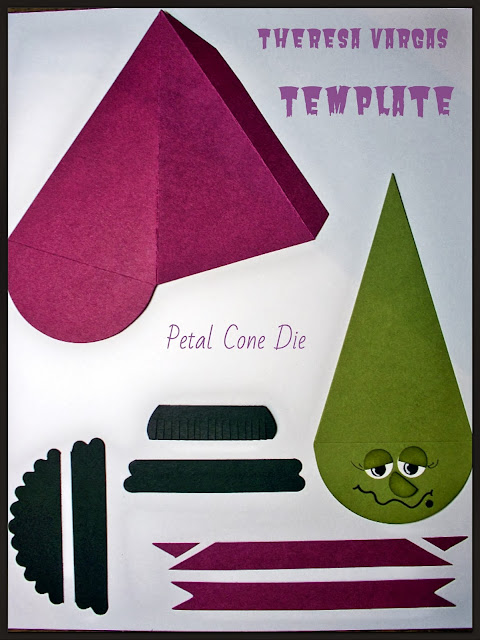
Today's post is focused on a Halloween witch card. This is a card I actually created a couple of years ago for Sandy Hancock's card contest at her quarterly demonstrator meeting.  You can see the original post on Sandy's blog here. I was lucky enough to have been selected one of the winners! :) Unfortunately Stampin Up has discontinued the petal cone die which I used to make this cute witch card/treat holder. If you own the petal cone die you should give this a try. I have included a picture below with all the pieces I used to make the witch. The original post on Sandy's blog also has a list of all the materials I used. This card is easy to make and so cute to give to your favorite trick or treater with a little candy tucked inside.

Thanks for stopping by!


Monday, September 30, 2013

Cupcake Gift Card Holder

Hello, today I thought I would share a cupcake gift card holder I made. I have seen so many of these pretty gift card holders out there on the web that I thought I had to try and make one.  Now, I was completely rushing through the whole creative process so this could have turned out much better.  But since I was in a big hurry I don't think it came out to bad :) 
 
Since I honestly didn't know how it was going to turn out I did not take photos of the creative process. I did find instructions to make the cupcake gift card holder here.  There is also a YouTube video(s) with step by step instructions.  Thank you to these two awesome ladies for sharing the instructions! I appreciate it so much :) Click here for Teresa Black's YouTube video.


I didn't make the base from scratch as in the video since I was pressed for time so I used what I had on hand.  I used a cup and cut it down to size (see picture above).  I glued the foam ball inside the foam cup (larger piece).  To make the pink and white frosting I used Stampin Up card stock in 1 1/2 strips (I would cut them smaller to maybe 1" strips if I was going to make this again). I wet the card stock and crinkled it all up into a ball.  I than carefully stretched the card stock out and shaped it around the foam ball.  Once I was pleased with how it looked on the foam ball I carefully removed the wet crinkled card stock and put it aside to dry. I also used ribbon as the base of the frosting.  I used hot glue to adhere everything together.  Use your imagination and get really creative on the decorations. You could use flowers, ribbons, buttons, beads, etc. I used a small binder clip to hold the gift card and glued a plastic cherry to it.

I hope this post inspires you to give this adorable gift card holder a try. Thanks for stopping by!

Friday, September 27, 2013

Stampin Up Christmas Angels

Hello,

Happy Friday!  Today's post is a project I found this past weekend surfing the web. I found the instructions for these adorable angels here.  I appreciate sooo much when people take the time to do tutorials.  I know how much time and energy it takes.  Thank you!!!!!

I used some retired DSP from Stampin Up and I recommend using sticky strip and/or hot glue. I am pretty inpatient so holding pieces together and waiting for things to dry was not for me. 

I hope you give these cuties a try.  You could embellish as much or as little as you want. These angels make pretty ornaments, gift tags etc.

I hope you all have a good weekend and thank you for stopping by!


Thursday, September 19, 2013

Caramel Apple Treats

Hello,

Today's post was inspired by my last post.  It's just a smaller version of the caramel apple card. And it's easy to make!  Lets get started.  I used a 3" circle as a template.  You can use Stampin Up's circle framelits, a cookie cutter, punch or any round object. I cut my card stock base at 7" x 4" and folded in half. I than used the 3" circle to trace my base (see picture below). Make sure you trace the circle on the folded edge to give you a proper card base. I used my 1/2" circle punch to cut out the hole for the stick.  I also used the 3" circle to free hand the "caramel". I sponged all pieces and used a white marker to draw the highlights. 


I taped the wrapper on the back of the candy so it could fit in the card base.


Stamp or write a Halloween message on the back.  Or use a "To/From" stamp on the back to personalize. Wrap it up in a cello treat bag, tie with ribbon and your done! It's than ready for any trick or treater. 

Thanks for stopping by!


Saturday, September 7, 2013

Paper Craft Class

Hello,

I apologize for being MIA.  I wanted to share the projects we made in our Saturday class.  As always the ladies did a great job on their projects.

The caramel apple card is made with Lynn Pratt's free template on her blog. Thanks Lynn!
The bows are made with the new Stampin Up Gift Bow Bigz die in the Holiday catalog. 

We used caramel apple suckers I bought at Smart & Final for the treat bags. 

Thanks for stopping by!